 Hosted E-mail – Local Outlook Junk E-mail Filtering
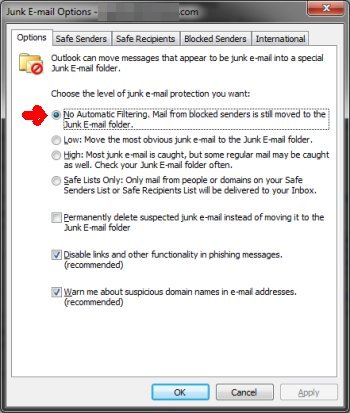
Microsoft Outlook offers a SPAM prevention feature called ‘Junk E-mail Filtering’ – it’s built into the product and offers a few settings “No Automatic Filtering”, “Low”, “Medium”, “High” and “Safe Lists Only”. Although this feature may be useful for personal residential based accounts, when using DNS Texas SPAM filtering at the server level, this setting should always be set to “No Automatic Filtering” as any settings that are enabled here can intercept legitimate e-mails passed from the mail servers.
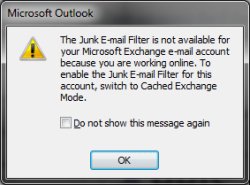
Follow these directions to ensure your Outlook settings are correct. If you are in a server-based domain environment in your organization, your system administrator can change these settings for you via group policy. Note by default only accounts that are setup in ‘cached mode’ will have this option available. If you are not in cached mode, you will see this message (you can still hit “OK” to check settings):
FIGURE : Outlook in non-cache mode informational screen.

OUTLOOK 2003 & OUTLOOK 2007 : Click ‘TOOLS’, choose ‘OPTIONS’, on the “PREFERENCES” tab, under “E-MAIL”, click “Junk E-mail” – set the protection level and hit “OK”. You should close outlook and re-launch after changing the setting to ensure the setting sticks.
OUTLOOK 2010 : Click the ‘HOME’ tab, in the ‘DELETE’ group, click ‘JUNK’ and then ‘Junk E-mail Options’. In the junk options, set the protection level and hit “OK”. You should close outlook and re-launch after changing the setting to ensure the setting sticks.

 OUTLOOK 2013 : Click the ‘HOME’ tab, choose ‘JUNK’, ‘Junk E-mail Options’. In the junk options, set the protection level and hit “OK”. You should close outlook and re-launch after changing the setting to ensure the setting sticks.
IMPORTANT : You need to check these settings on any copy of Outlook you are running. For example, on your laptop and your desktop computer, as each copy of Outlook contains its own settings for junk e-mail.
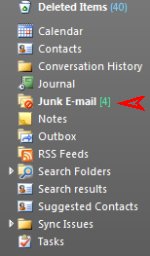
If you did have Junk E-mail enabled, you should immediately review the ‘Junk E-mail’ folder in outlook and check for legitimate messages. Delete what you don’t need. You will need to drag any valid message(s) on to your main inbox folder to reply and view graphics. Look at your folder tree in outlook, find the ‘Junk E-mail’ folder, if it has a number after it, that’s how many messages are stored within it that need review.

If you have further questions, you may [contact] the DNS Texas Helpdesk for assistance.
![]()
